

How to Set Up Google Ads Conversion Tracking with Google Tag Manager

By Elisa Frazier
First Steps
Before you start the setup process make sure you have the live URLs and have access to add a tag to the website.
Setup Steps
Part I - Google Ads
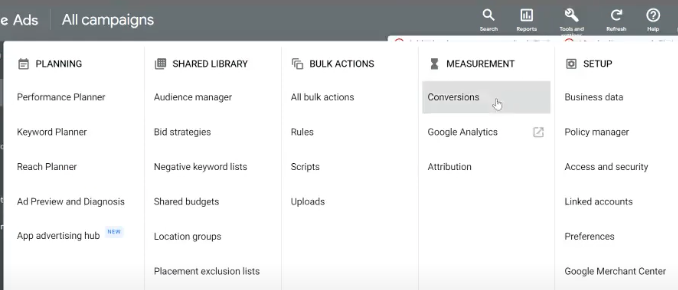
1. Log in to your Google Ads account
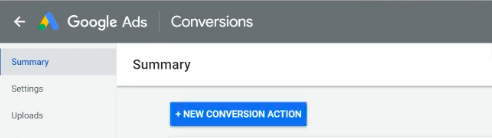
2. On the top panel click [Tools], [Conversions], then click on the [+ New ConversionAction] button
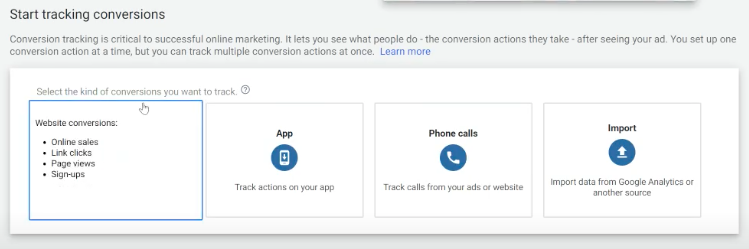
3. From the 4 options, click [Website]
4. Setup the Conversion Action
a. Select Goal
b. Name the Conversion
c. Select Value
d. Select Count
e. Select Engaged view conversion window
f. Select attribution Model
g. Click [Create and Continue]
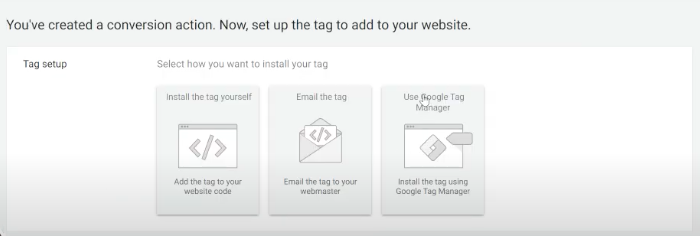
h. From the 3 options, click Use Google Tag Manager
Part II - Tag Manager
1. Go to Google Tag Manager
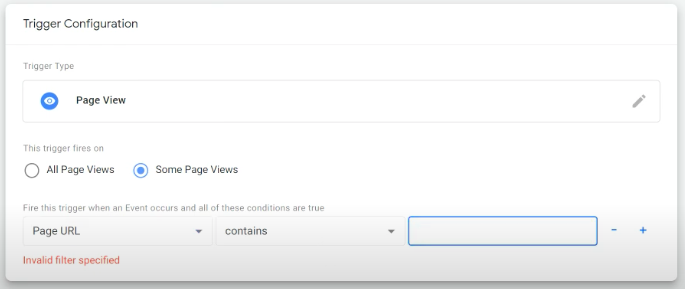
2. Go to the Triggers page on the left panel
a. In Triggers, click [New]

b. Name the trigger configuration
c. Click in the Trigger configuration box
d. Click Page View
e. Select this trigger files on [Some Page Views]
f. Select Click Classes [Page URL] contains,
g. Copy the link to your URL
h. Paste it in the box after contains
3. Go to the Tags page on the left panel
a. Click [New]
b. Name the tag
c. Click in the Triggering box
d. Choose a trigger [Checkout Review Trigger]
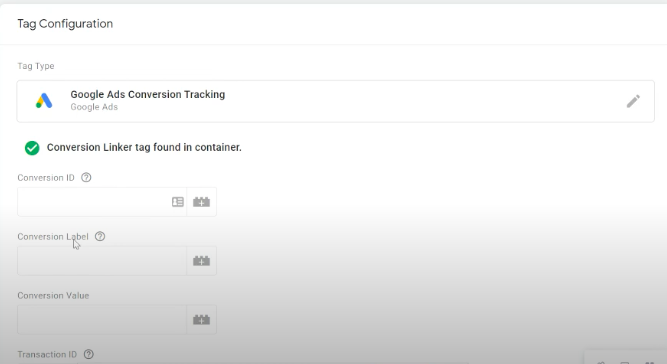
e. Click in the Tag Configuration box
f. Under choose tag type, click Google Ads Conversion Tracking

g. Copy your Conversion ID from the Tag Setup (see screenshot above)
h. Paste the [Conversion ID] to the Tag Configuration Conversion ID box
i. Copy your Conversion Label from the Tag Setup (see screenshot above)
j. Paste the [Conversion Label] to the Tag Configuration Conversion Label box
4. Click [Save]
5. Click [Submit]
6. Check that everything looks right
7. Click [Publish]
Why brands choose MAIUS
Brands come to us for predictable growth, transparent reporting, and a team that actually cares about performance. No long contracts, no jargon. Just better results.


From audit → foundation → scale
Related Posts


.jpg)


Copyright © 2025 MAIUS. All Rights Reserved. Built by Jessie Hackett